Connect HubSpot to SessionPBX
SessionPBX brings HubSpot contacts into your team’s shared contact directory. Import names, companies, email addresses and phone numbers, or enable bidirectional sync to keep linked contacts updated in both systems. Your team can use the contacts in the workspace and supported SessionCloud mobile and desktop apps after refreshing contacts.
This integration synchronizes contacts. It does not log calls or messages in HubSpot and does not synchronize deals, tickets or company records.
Availability and pricing
HubSpot contact sync is included with Teams Business and is not available on Teams Phone. The published Teams Business price is $40 USD per month for five seats, plus $6 USD per additional seat per month. There is no separate HubSpot integration fee. See the current SessionPBX pricing for plan and partner pricing.
The integration is available for hosted and licensed self-hosted Teams Business workspaces with CRM integrations enabled. A HubSpot account is required separately.
Before you start
- You need a SessionPBX Teams Business workspace with CRM integrations enabled and a workspace administrator account. Contact SessionTalk support if Admin → Integrations is not available.
- Hosted and licensed self-hosted workspaces use the same SessionPBX app. You do not need to register your own HubSpot developer app or enter an OAuth client secret.
- You need access to a HubSpot CRM account and permission to install SessionPBX. If your account uses app governance, ask a HubSpot Super Admin to approve the app and the contact permissions you need.
- Choose an existing shared contact group, or a name for the group you want imported contacts to use. The group is a SessionPBX directory group, not a HubSpot list.
Connect your HubSpot account
- Sign in to your SessionPBX workspace. Hosted customers can start in the SessionCloud portal ; self-hosted customers use their own workspace address.
- Open Admin → Integrations and select Connect HubSpot.
- Check the workspace shown on the SessionPBX connection page and continue to HubSpot. The authorization flow opens in another tab. If your browser blocks it, use the Continue to HubSpot link in the original tab.
- Sign in to HubSpot, choose the CRM account you want to connect, review the requested access and approve the connection.
- Return to the workspace. Open Manage HubSpot to review the connected account and import settings.
The initial connection requests permission to read contacts. Bidirectional sync also requires permission to create and update contacts. SessionPBX does not request permission to delete HubSpot contacts.
Always check the connected account before importing. If you choose a different account from one used previously, complete the account-switch review described below first.
Configure and preview an import
- Leave Sync direction set to CRM to workspace for an import from HubSpot.
- Select the Contact group for newly imported contacts.
- Choose the Default phone country. This is used when a number does not include an international country code.
- Review Field mappings for names, company, email, phone and mobile numbers.
- Choose whether to Only import contacts with a phone number.
- Select Save import settings, then Preview import.
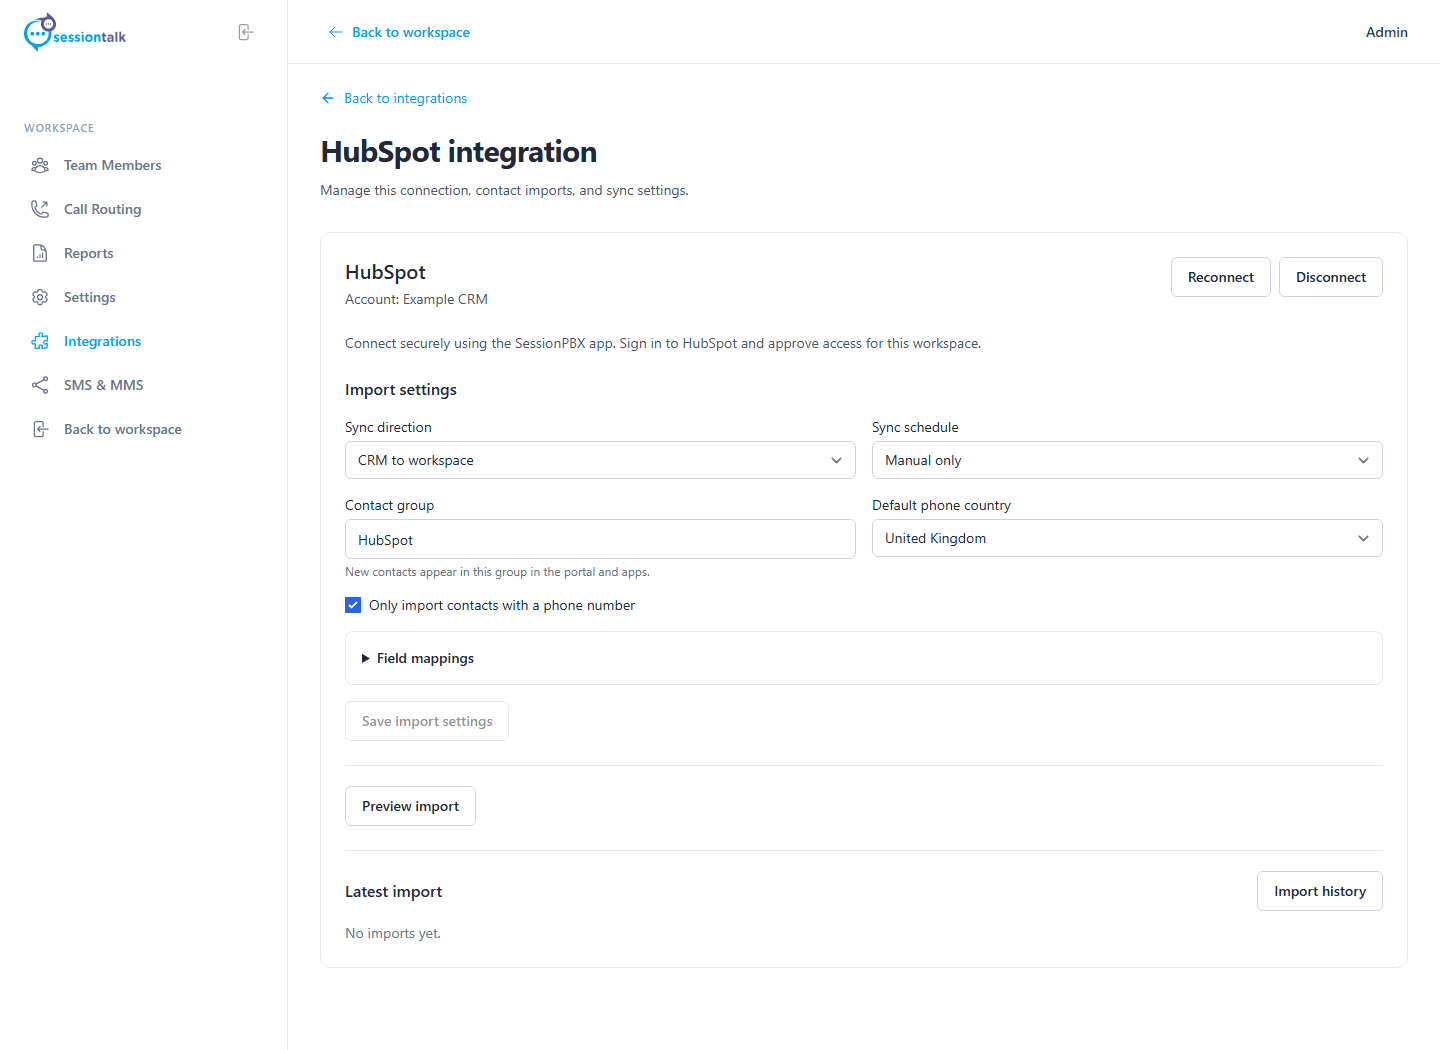
Example settings in a demo workspace. The account and contacts shown in this guide are sample data.
The preview shows a sample of up to 25 records from the first page returned by HubSpot. It is not the total number of contacts that will be imported. Check the proposed names and phone numbers, and resolve any mapping or country errors before continuing.
Select Import contacts to start. The import runs in the background. Latest import and Import history show progress and records created, updated, skipped or failed. A failed record does not prevent other valid records from being imported.
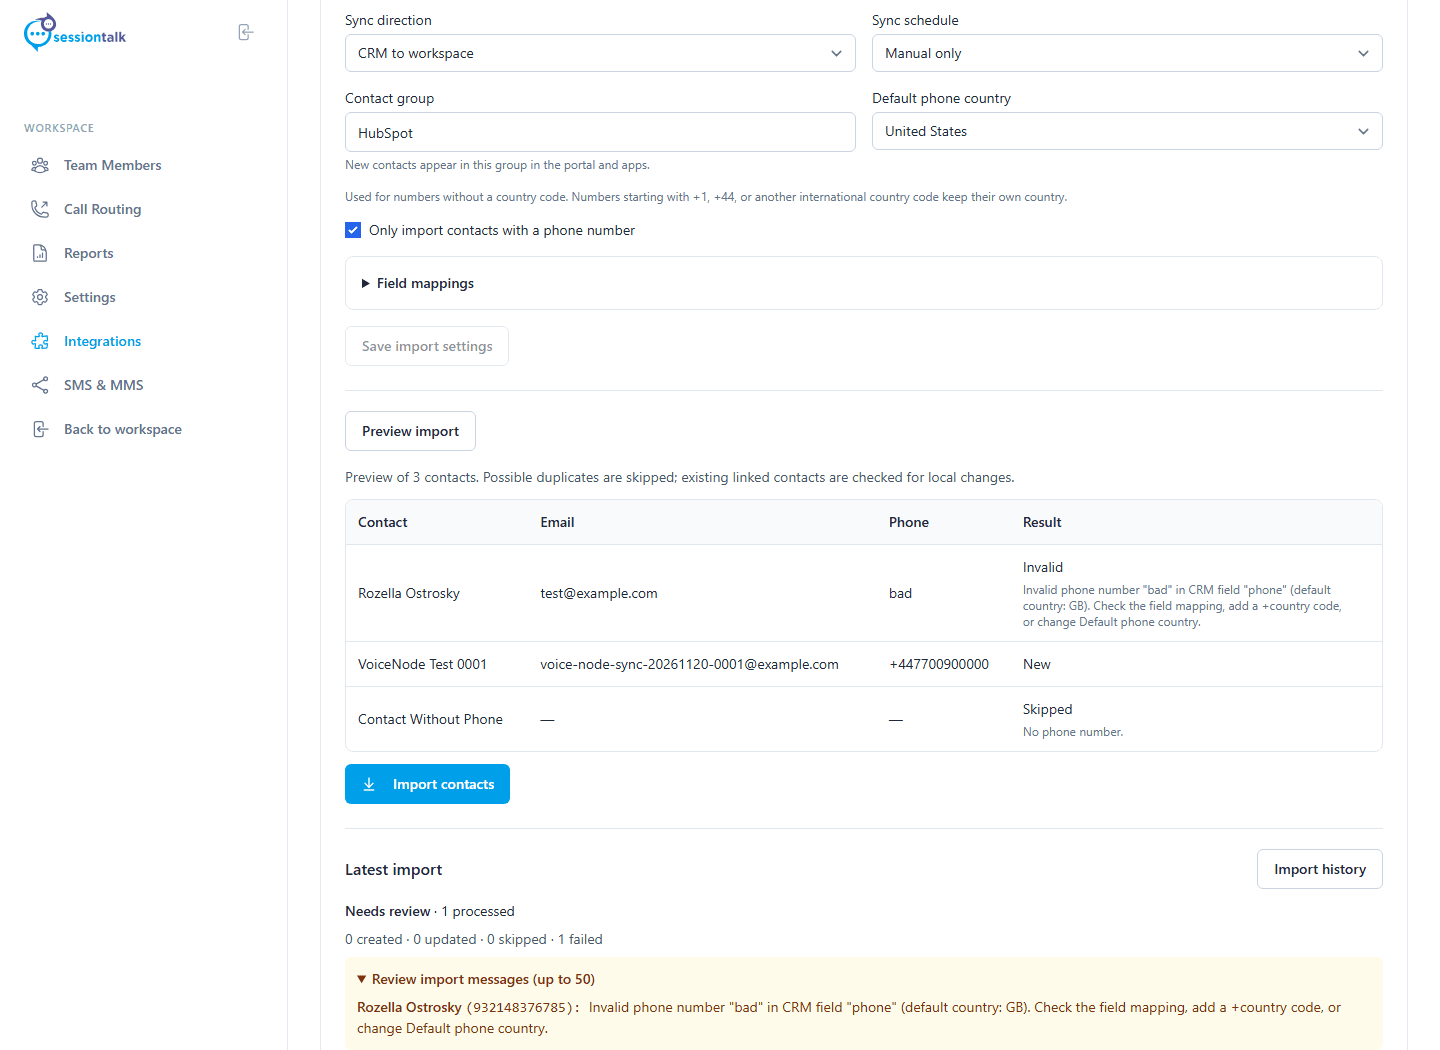
Imported contacts appear in the shared directory after a refresh, including in supported mobile and desktop apps connected to the same workspace. This does not copy contacts into a device’s personal address book or a standalone SIP account’s local contacts. Changing the destination group later affects newly created contacts; it does not move contacts already imported.
Enable bidirectional sync
- Open Admin → Integrations → Manage HubSpot.
- Set Sync direction to Both directions.
- If you also want new SessionPBX contacts to be created in HubSpot, enable Create CRM records for new workspace contacts in the selected group. Leave this off if you only want to update contacts that are already linked.
- Save the settings and reconnect when prompted to grant contact write permission. A connection with read permission alone cannot send updates to HubSpot.
- Preview the changes, then select Sync contacts.
For automatic runs, choose a Sync schedule of every 15 minutes, hourly, every six hours or daily, and save. The default is Manual only. Review the run history after your first sync and after changing mappings.
Bidirectional sync updates mapped contact fields. It does not synchronize contact deletions. Contacts missing from a HubSpot response are retained locally. Local favourites and group assignments are retained.
Resolve validation errors and conflicts
- Invalid phone number: correct the number in HubSpot, or check the default country and the mapped phone field. Use a valid international number where possible, then run sync again.
- Possible duplicate: a matching email address or normalized phone number requires review. SessionPBX does not automatically merge people who share a number.
- Conflicting changes: when a mapped field has changed in both systems since the previous sync, the change is held for administrator review instead of silently overwriting either version. Review the affected contact before retrying.
- Names missing: check the first-name, last-name and display-name mappings and their source values, then preview again.
Cancelling a run retains completed imports and confirmed writes to HubSpot. A request already in progress can finish before cancellation takes effect.
Switch to another HubSpot account
Reconnect and choose the new account. SessionPBX hides the previous account’s linked contacts from the shared directory and apps, and pauses sync until you choose what to do with the previous local copies:
- Archive contacts keeps their local identifiers, favourites and source links. If you reconnect to that account later, retained enabled contacts can become visible again.
- Remove local contacts deletes the previous local copies and links after confirmation. This does not delete records from HubSpot. Contacts with another source link are preserved.
Manual contacts and CSV imports without a CRM source link remain available. Archived contacts are excluded from matching and outbound sync to the new account. Reconnecting to the same HubSpot account reuses its links without this account-switch prompt.
Disconnect or uninstall
To stop syncing in SessionPBX, open Admin → Integrations → Manage HubSpot and select Disconnect. This cancels active work and removes the stored connection credentials. Imported contacts and their source links remain; disconnecting does not delete contacts in either system.
To remove SessionPBX’s authorization from HubSpot, open HubSpot Settings → Integrations → Connected Apps, locate SessionPBX and use the available uninstall controls. An administrator may need to manage the installation. Follow HubSpot’s connected apps guide and app access instructions for the controls available in your account.
Uninstalling in HubSpot stops authorized access but does not undo previous contact changes or remove the copies already imported into SessionPBX. Reconnect from SessionPBX if you want to resume syncing.
Connection troubleshooting
No accounts match that search: clear the search filter and check your HubSpot accounts . Make sure you are signed in with a user who belongs to the intended CRM account. If no CRM account is available, ask its administrator for an invitation or create one. In the original SessionPBX tab, select No accounts shown for recovery guidance, then Try connecting again.
The app has not been approved for contact write access: ask your HubSpot Super Admin to approve SessionPBX and its contact write permission in app governance. Then reconnect from SessionPBX and approve the additional permission.
Expired or incomplete authorization: return to the workspace and start a new connection attempt. Do not reuse an old authorization link. Keep the original workspace session signed in until authorization finishes.
For help, email support@sessiontalk.co.uk with your workspace name, the affected run time and the error message. Do not send passwords, authorization codes or access tokens.